5.2 KiB
VOIP for Matrix SDK
1:1 and group calls
Overview
VoIP is a module that provides a simple API for making 1:1 and group calls.
CallSession objects are created by calling inviteToCall and onCallInvite.
GroupCall objects are created by calling createGroupCall.
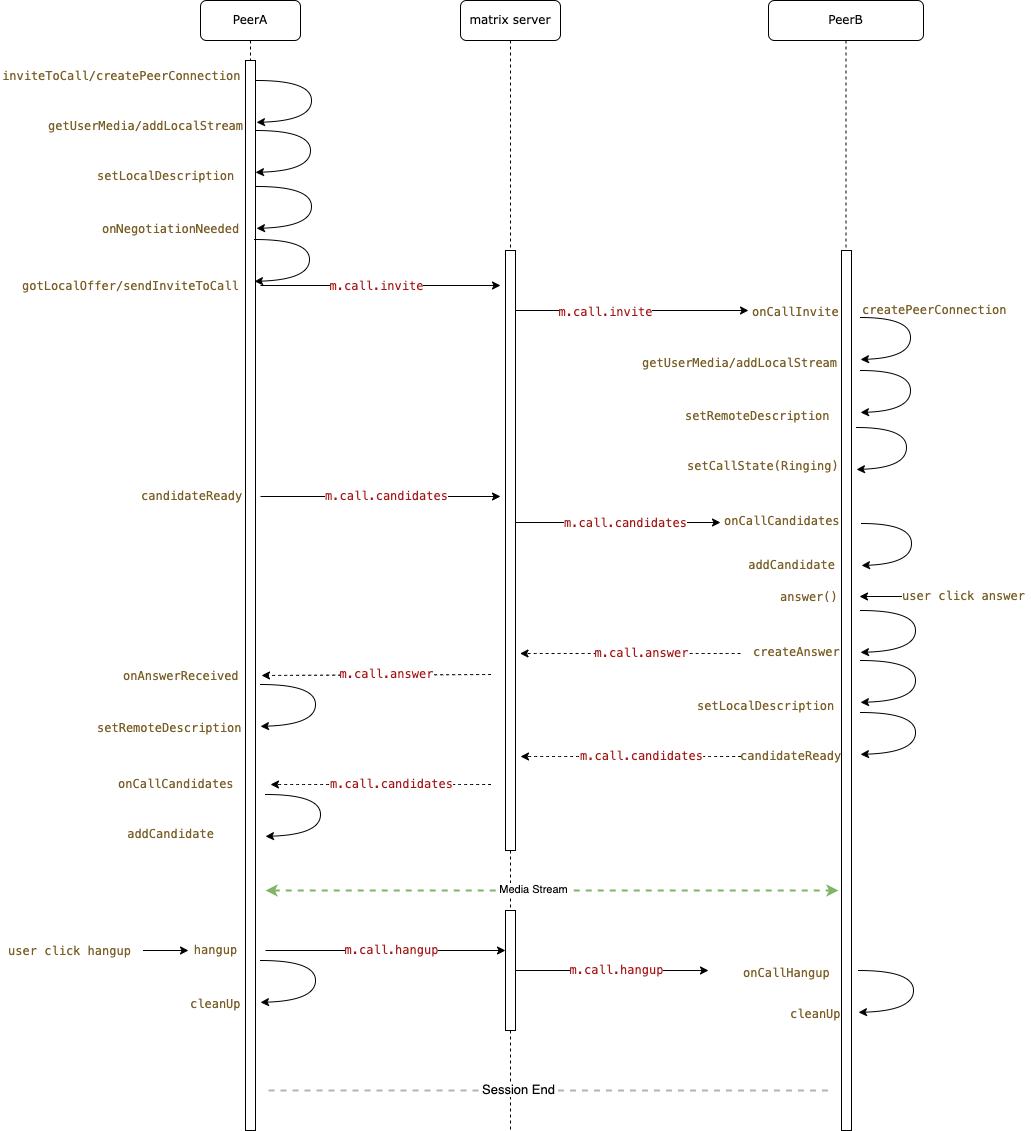
1:1 calls
1. Basic call flow
This flow explains the code flow for a 1v1 call.
This code flow is still used in group call, the only difference is that group call uses toDevice message to send m.call.* events
2.Implement the event handlers
The code here is to adapt to the difference between flutter app and dart web app and prevent importing flutter dependencies in dart app.
We need to import dart_webrtc or flutter_webrtc, and map the platform-specific API (mediaDevices, createPeerConnection, createRenderer)
implementations to the corresponding packages.
In addition, we can respond to the call to start and end in this delegate, start or turn off the incoming call ringing
// for dart app
import 'package:dart_webrtc/dart_webrtc.dart' as webrtc_impl;
// for flutter app
// import 'package:flutter_webrtc/flutter_webrtc.dart' as webrtc_impl;

class MyVoipApp implements WebRTCDelegate {
  @override
  MediaDevices get mediaDevices => webrtc_impl.navigator.mediaDevices;
  @override
  Future<RTCPeerConnection> createPeerConnection(
      Map<String, dynamic> configuration,
      [Map<String, dynamic> constraints = const {}]) =>
      webrtc_impl.createPeerConnection(configuration, constraints);
  @override
  VideoRenderer createRenderer() => RTCVideoRenderer();

  @override
  void playRingtone(){
      // play ringtone
  }
  void stopRingtone() {
      // stop ringtone
  }

  void handleNewCall(CallSession session) {
    // handle new call incoming or outgoing
    switch(session.direction) {
        case CallDirection.kIncoming:
            // show incoming call window
            break;
        case CallDirection.kOutgoing:
            // show outgoing call window
            break;
    }
  }

  void handleCallEnded(CallSession session) {
    // handle call ended by local or remote
  }
}
3.Start a outgoing call
When the delegate is set we can initiate a new outgoing call.
We need to use the matrix roomId to initiate the call, the initial call can be
CallType.kVoice or CallType.kVideo.
After the call is sent, you can use onCallStateChanged to listen the call state events. These events are used to change the display of the call UI state, for example, change the control buttons, display Hangup (cancel) button before connecting, and display mute mic, mute cam, hold/unhold, hangup buttons after connected.
final voip = VoIP(client, MyVoipApp());

/// Create a new call
final newCall = await voip.inviteToCall(roomId, CallType.kVideo);

newCall.onCallStateChanged.stream.listen((state) {
  /// handle call state change event,
  /// You can change UI state here, such as Ringing,
  /// Connecting, Connected, Disconnected, etc.
});

/// Then you can pop up the incoming call window at MyVoipApp.handleNewCall.
class MyVoipApp implements WebRTCDelegate {
...
  void handleNewCall(CallSession session) {
      switch(session.direction) {
          case CallDirection.kOutgoing:
              // show outgoing call window
              break;
      }
  }
...

/// end the call by local
newCall.hangup();
4.Answer a incoming call
When a new incoming call comes in, handleNewCall will be called, and the answering interface can pop up at this time, and use onCallStateChanged to listen to the call state.
The incoming call window need display answer and reject buttons, by calling newCall.answer(); or newCall.reject(); to decide whether to connect the call.
...
  void handleNewCall(CallSession newCall) {
      switch(newCall.direction) {
          case CallDirection.kIncoming:
              /// show incoming call window
              newCall.onCallStateChanged.stream.listen((state) {
                /// handle call state change event
              });
              break;
      }
  }
...

/// Answer the call
newCall.answer();
// or reject the call
newCall.reject();
5.Render media stream
The basic process of rendering a video stream is as follow code.
class RemoteVideoView extends Widget {
VideoElement get videoElement => renderer.element;

RTCVideoRenderer get renderer => remoteStream.renderer as RTCVideoRenderer;

final WrappedMediaStream remoteStream;

RemoteVideoView(this.remoteStream){
    renderer.srcObject = remoteStream.mediaStream;
}
...
 @override
  Element build() {
    return divElement(
        children: [
            ...
            videoElement,
            ...
        ]);
}
...

}
Usually there are four media streams in a 1v1 call, which are
localUserMediaStreamlocalScreenSharingStreamremoteUserMediaStreamremoteScreenSharingStream
They can be get by the methods of CallSession. the newCall.onCallStreamsChanged event is fired when these streams are added or removed.
When the media stream changes, we can change the UI display according to the priority.
remoteScreenSharingStream always needs to be displayed first, followed by remoteUserMediaStream